


1. Introduction to Risk Registers
A. What is a Risk Register?
A risk register is a fundamental tool in project risk management. It is a structured document or database used to capture, track, and manage all identified project risks throughout the project lifecycle. Each entry typically includes the risk’s description, probability, impact, ownership, mitigation strategy, and current status.
Formal Definition: A risk register is a central repository used in risk management to document potential events that could impact a project (positively or negatively), analyze their likelihood and impact, and assign plans to address them.
Analogy: Think of the risk register as your project’s “weather forecast.” Just as a forecast warns you of potential storms, helping you plan your day, a risk register anticipates issues that could derail your project, enabling you to plan ahead.
B. Why is a Risk Register Important?
Managing risks is not a luxury—it’s a necessity for project success. A risk register ensures:
- Early visibility of potential threats and opportunities
- Structured analysis and prioritization
- Actionable response planning
- Accountability through ownership assignment
Proactive vs. Reactive Risk Management
Projects that anticipate risks can avoid or mitigate them. Those that ignore risks respond too late. A proactive register empowers your team to act before issues materialize.
“An ounce of prevention is worth a pound of cure.”
PMI Statistics: The Cost of Ignoring Risks
According to PMI’s Pulse of the Profession:
- 27% of projects fail outright
- 35% of projects experience significant scope creep
- Poor risk management is cited as a contributing factor in 1 out of 3 failed projects
C. Tools Comparison
Risk Matrix vs. Risk Register
While often used together, the Risk Matrix and the Risk Register serve different purposes. The matrix is a tool for analyzing risks, whereas the register is a comprehensive record for managing them throughout the project.
- Risk Matrix is a visual tool used within the register to rate severity (impact x probability).
- Risk Register houses the entire lifecycle: identification, assessment, ownership, response.

Issue Log vs. Risk Register
In project management, a risk is a potential problem that might happen in the future, while an issue is a problem that has already occurred. Understanding this difference is key to use the right tool at the right time.
- Issue Log tracks problems currently affecting the project.
- Risk Register forecasts potential problems before they occur.
Role in the Risk Management Plan
The risk register is the tactical execution component of your broader Risk Management Plan, serving as the operational system to track risks in real time.
2. Key Components of a Risk Register
A. Core Elements
Risk Identification
Each risk should be uniquely identifiable:
- Risk ID: e.g., RSK-001
- Risk Description: e.g., “Potential delay in vendor delivery due to geopolitical instability”
Risk Categorization
Organize risks into relevant categories:
| Category | Examples |
|---|---|
| Financial | Budget overruns, funding delays |
| Operational | Equipment failure, process inefficiencies |
| Legal | Regulatory non-compliance, licensing gaps |
| Reputational | Negative media coverage, stakeholder fallout |
Risk Ownership
Every risk must have a responsible owner:
- Assigned via RACI Matrix
- E.g., John Smith (Procurement Manager) owns RSK-003
B. Risk Analysis & Prioritization
Probability & Impact Assessment
Use a consistent scoring system:
| Level | Score | Description |
|---|---|---|
| Low | 1 | Rare or minimal |
| Medium | 3 | Likely or moderate |
| High | 5 | Almost certain/severe |
Risk Scoring Matrix (Heat Map)
A color-coded grid helps visualize risk severity ( view risk matrix) :
| Impact \ Probability | Low (1) | Medium (3) | High (5) |
|---|---|---|---|
| Low (1) | Green | Green | Yellow |
| Medium (3) | Green | Yellow | Red |
| High (5) | Yellow | Red | Red |
Urgency Indicators
- Identify time-sensitive risks (e.g., regulatory changes)
- Tag with flags or timestamps
C. Response & Monitoring
Mitigation Strategies
Not all risks are negative. In project management, threats represent potential harms, while opportunities offer potential gains. Each type requires a different strategic response. Threat responses aim to reduce or eliminate negative impact, whereas opportunity responses aim to maximize benefits. In both cases, escalation may be needed if the risk is beyond the project manager’s authority.
Responses to Threats
- Accept: Do nothing; monitor the risk.
- Mitigate: Reduce the probability or impact.
- Transfer: Shift the risk to a third party (e.g., insurance).
- Avoid: Eliminate the risk entirely by changing the plan.
- Escalate: Involve the sponsor or steering committee if outside PM’s control.
Responses to Opportunities
- Accept: Do nothing; monitor in case it occurs.
- Enhance: Increase the likelihood or impact of the opportunity.
- Share: Collaborate with another party to realize the benefit.
- Exploit: Take proactive steps to ensure the opportunity happens.
- Escalate: Hand over to higher authority if beyond the PM’s scope.
Contingency Plans
A contingency plan outlines predefined actions to take if a specific risk materializes. It uses simple “If-Then” logic to ensure the team is ready to respond without delay, minimizing impact on the project.
- If vendor delay > 2 weeks, then activate backup supplier
Status Tracking
Track current state:
- Open: Being monitored
- Mitigated: Actions in place
- Closed: No longer a threat
3. Step-by-Step: How to Create a Risk Register
Step 1 : Risk Identification
Risk identification is the foundation of risk management. It involves spotting potential events that could impact the project, positively or negatively. A risk becomes meaningful only when it’s tied to a trigger—a specific condition or signal that could cause it to materialize. Identification is not a one-time activity; it should occur throughout the project lifecycle, adapting as the project evolves.
Techniques:
- Brainstorming with SMEs
- SWOT Analysis
- Delphi Method
Tools:
- Historical data analysis
- Stakeholder interviews
- Industry risk checklists
Step 2 : Risk Assessment
Risk Assessment involves analyzing identified risks to understand their potential impact. This step comes in two forms: qualitative and quantitative analysis.
- Qualitative Risk Analysis : it’s the first layer, focusing on subjective evaluations such as probability and impact, data quality, risk categorization (threats vs. opportunities), and urgency. Techniques like What-If Scenario Analysis, Alternative Analysis, and Decision Tree Analysis help prioritize risks based on their potential effect and inform decision-making.
- Quantitative Risk Analysis : it’s more advanced and used on high-priority risks. It assigns numerical values to assess the overall risk exposure. Tools like Expected Monetary Value (EMV) and Monte Carlo Simulation are used to model risk outcomes and determine how much contingency reserve may be required—especially for threats.
Step 3 : Response Planning
It focuses on assigning the most appropriate strategy for each risk—based on its type (threat or opportunity)—and evaluating the cost-effectiveness of the proposed actions.
This planning phase includes developing contingency plans and reserves, establishing fallback plans for high-impact risks, allocating management reserves for unknown unknowns, and preparing workarounds for potential issues. Each risk should be logged in the Risk Register, assigned to a Risk Owner, and integrated into the overarching Risk Management Plan to ensure accountability and traceability throughout the project.
Step 4 : Implementation & Monitoring
It involves putting planned responses into action and continuously tracking risk status through structured review cadences—whether weekly, monthly, or aligned with key milestones.
Monitoring includes measuring risk exposure (the potential impact of unresolved risks) and risk velocity (how quickly a risk could materialize), ensuring timely interventions and maintaining project control.
4. Common Pitfalls & Best Practices
Even well-designed risk registers can fail if not properly maintained or used. To maximize their value, project managers must avoid common pitfalls and apply best practices that keep the register relevant, actionable, and aligned with stakeholder needs.
Mistakes to Avoid
- Treating the risk register as a one-time document
- Using vague risk descriptions: e.g., replace “Budget risk” with “$50K overrun due to procurement delays”
Pro Tips
- Color-code by urgency or score
- Customize views for stakeholders (e.g., executives vs. team leads)
- Integrate with PM dashboards for visibility
5. Conclusion & Key Takeaways
A strong risk register is more than a compliance artifact—it’s a dynamic tool that supports proactive decision-making. Wrapping up, here’s a quick checklist of do’s and don’ts to ensure your risk register stays effective throughout the project lifecycle.
Do’s:
- Identify and log risks early
- Use standardized scales for assessment
- Assign clear owners
- Regularly review and update the register
Don’ts:
- Ignore low probability/high impact risks
- Leave vague or unowned risks in the register
- Forget to track resolved risks (for lessons learned)
Download a Free Stakeholder Register Template
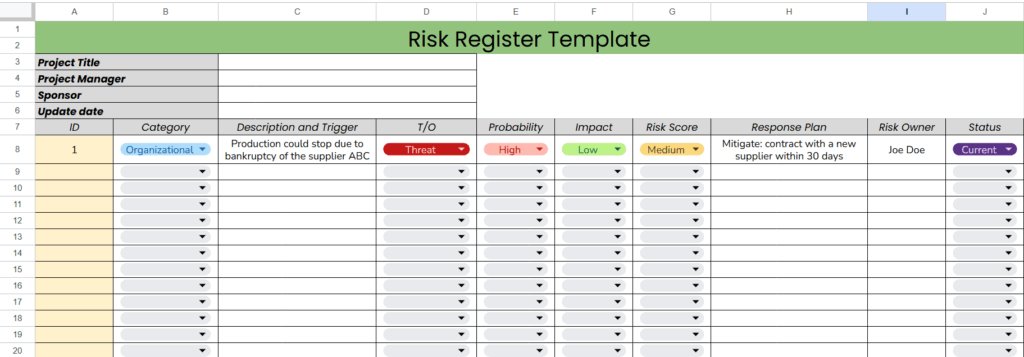
As a final resource and to support fellow project managers, I’m sharing a free, ready-to-use Risk Register template—the same structure I rely on in my own projects as a project manager.
Designed in Excel and aligned with the PMBOK® Guide, this tool is fully customizable to fit your project context. Download it, adapt it, and start managing risks with clarity and confidence.